Starting a mod
Setting up your project
WARNING
This guide assumes you've completed all the required steps in initial setup, or that you know what you're doing.
This guide follows certain parts of the official BepInEx guide.
Using the template repository (Harmony Only)
INFO
You can create a basic BepInEx plugin template for Crawlspace 2 modding. While there isn't a Crawlspace 2-specific template yet, you can use the standard BepInEx template and adapt it for Crawlspace 2.
If you're familiar with GitHub, you can use a template repository as a quick start. It is important that you remove all unused template code from the project before distributing your mod.
Using the dotnet template
First things first, you'll need to create your project. You can create a standard C# Class Library project targeting .NET Framework 4.7.2 for Crawlspace 2 modding.
Next, you'll want to create a new project (sometimes called "solution", in CSharp). There are two main ways to do this.
Using an IDE (easier)
Depending on your IDE, this process will look slightly different. You'll want to give the solution the name of your soon-to-be mod. Create a new C# Class Library project targeting .NET Framework 4.7.2.
Using the console (recommended for control)
Alternatively, you can open a console and create a new Class Library project. Replace MyFirstMod with your mod's name:
dotnet new classlib -n MyFirstMod -f net472Note for MonoMod users
MonoMod vs Harmony
Crawlspace 2 mods typically use Harmony for patching (as seen in the multiplayer mod). MonoMod is an alternative patching framework that's also compatible with BepInEx.
For most Crawlspace 2 modding, Harmony is recommended as it's well-documented and widely used.
Organising your modding projects
We recommend creating a folder somewhere easily accessible that will store all of your future modding projects. Something like "Crawlspace2Mods". Move the newly created folder for your mod into this folder, to keep things well-organised.
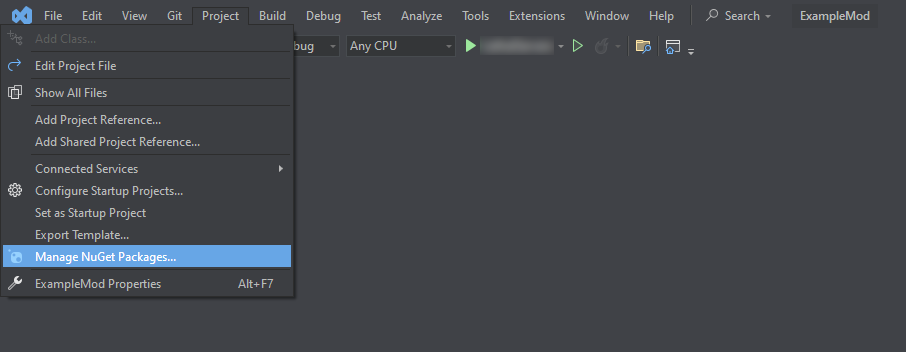
Adding NuGet source
BepInEx uses a separate NuGet source. You'll need to add the BepInEx NuGet source to your global source list.
The BepInEx NuGet source has the following configuration:
name: BepInEx
url: https://nuget.bepinex.dev/v3/index.json
Visual Studio
For Visual Studio, you can do this by going to the NuGet Package Manager window and clicking on the settings/gear icon.
This will bring up an options modal; click on the Package Sources tab, and then click on the green "+" icon in the top right. From there, you can add a new entry using the above configuration.
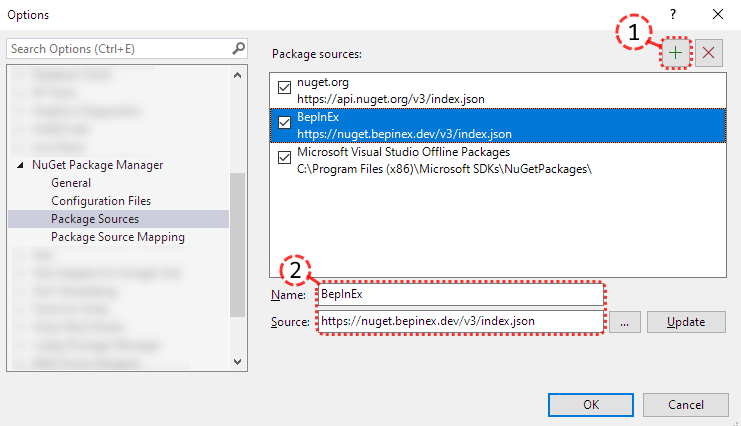
See Visual Studios's docs for more info.
Rider
For Rider, you can do this by going to the NuGet window, going to its Sources tab, and then clicking on the green "+" icon in the Feeds sub-tab. There, add a new entry using the above configuration.

See Rider's docs for more info.
VS Code
For VS Code, there is no built in method for NuGet Packages. The only way to add the BepInEx NuGet source is by modifying the NuGet.Config file in your project directory. Add the following code in the <packageSources> section:
<add key="BepInEx" value="https://nuget.bepinex.dev/v3/index.json" />This should result in a complete file resembling the following:
<?xml version="1.0" encoding="utf-8"?>
<configuration>
    <packageSources>
        <add key="BepInEx" value="https://nuget.bepinex.dev/v3/index.json" />
    </packageSources>
</configuration>
Making sure your mod is set up correctly
Mods are developed for specific versions of Unity and .NET, which can be specified in a configuration file. This file is a .csproj file, and has as name the name of your mod (e.g. MyFirstPlugin.csproj). If you used the console command correctly, it should work out of the box. However, you'll want to double check this to prevent any easy-to-fix problems that can result from not having it set up correctly. When using an IDE, the template might not use the correct version, so in this case you'll definitely have to check things.
INFO
Crawlspace 2 uses Unity 2021.3.3f1. Make sure your project targets the appropriate .NET version (.NET Framework 4.7.2) and Unity version to ensure compatibility.
"Building" your mod
Your IDE is capable of turning your code into a file that can be run (in this case by BepInEx as a mod). This process is called "building" or "compiling". In this case, it will turn your code into a .dll file. This file is your mod.
Depending on your IDE, the build button may be placed differently.
Visual Studio
For Visual Studio, it is the green arrow button with your project name:

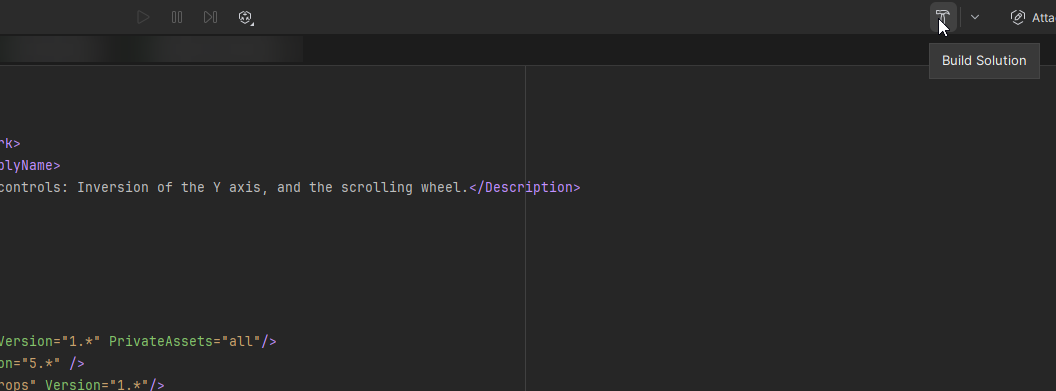
Rider
For Rider, it is in the top right:
VS Code
VS Code has no built-in way of building a C# project, as VS Code is a lightweight code editor and not a IDE. In order to build a C# project, you instead have to download the C# Dev Kit extension.
After installing the extension, you can build by pressing Ctrl+Shift+P, typing in Build and selecting .NET: Build.

Once built, you should be able to find the .dll file in your project's folder, in the following subfolder path (once again replacing MyFirstPlugin with the name you gave your mod/project): MyFirstPlugin/bin/(Release or Debug)/netstandard2.1/MyFirstPlugin.dll
Simply copy & paste this .dll file into the BepInEx/plugins folder, in your game directory, and it should run the mod. We recommend keeping the default LogInfo statement in your Awake method that comes with the template. If you have this statement, you should see it appear in the console that opens when you run the game (after installing BepInEx, and enabling the console as per the first wiki article).
Adding game assemblies
To actually use the game's methods and classes, you'll need to add the game's Assembly-CSharp.dll to your project's references. You can either do this manually by editing your .csproj file, or through a GUI your IDE provides. You will want to google how to do this for your specific IDE.
You will very likely also need the UnityEngine.dll, since this is required to use any of Unity's methods and classes.
The assemblies can be found in the game's data folder at VRFighter_Data/Managed.
TIP
To easily access private fields and methods in the game's code, you should publicize it! The process is easy, with just two additions:
- Add the
BepInEx.AssemblyPublicizer.MSBuildpackage in the NuGet Package Manager.- You can instead add
<PackageReference Include="BepInEx.AssemblyPublicizer.MSBuild" Version="0.4.1" PrivateAssets="all" />to the.csprojfile as so:
- You can instead add
<ItemGroup>
    <PackageReference Include="BepInEx.Analyzers" Version="1.*" PrivateAssets="all" />
    <PackageReference Include="BepInEx.Core" Version="5.*" />
    <PackageReference Include="BepInEx.PluginInfoProps" Version="1.*" />
    <PackageReference Include="UnityEngine.Modules" Version="2022.3.9" IncludeAssets="compile" />
    <PackageReference Include="BepInEx.AssemblyPublicizer.MSBuild" Version="0.4.1" PrivateAssets="all" />
</ItemGroup>- (a) Add
Publicize="true"to the assembly reference in the.csprojfile as so:
<Reference Include="Assembly-CSharp" HintPath="...\Assembly-CSharp.dll" />
<Reference Include="Assembly-CSharp" HintPath="...\Assembly-CSharp.dll" Publicize="true" />

<!-- OR -->

<Reference Include="Assembly-CSharp">
<Reference Include="Assembly-CSharp" Publicize="true">
    <HintPath>...\Assembly-CSharp.dll</HintPath>
</Reference>
(b) Or add <Publicize>"true"</Publicize> like so:
<Reference Include="Assembly-CSharp">
    <HintPath>...\Assembly-CSharp.dll</HintPath>
    <Publicize>"true"</Publicize>
</Reference>
Additional guides
We highly recommend reading through the rest of the official BepInEx guide for extra information.
Next steps
Check our list of tips for improving your modding workflow on Mod Testing Tips.
We also recommend reading through our very short guide on open-source & ethics, to help foster a healthy modding community.
Once you've finished a mod, you can publish it.